Hall or Nothing Productions Ltd: The Lord of the Rings: The Card Game
Showing posts with label The Lord of the Rings: The Card Game. Show all posts

Wednesday, October 08, 2014

Wednesday, February 26, 2014

2014 catch up, creativity and "1066, Tears To Many Mothers" gamers wanted!

EDIT - 1066 has now been added to the BGG database here:

http://boardgamegeek.com/boardgame/155122/1066-the-tears-of-many-mothers


For numerous horrible reasons 2013 was a difficult year for us.  I’m not going to dwell on it, and I’m determined to minimise its impact on 2014.  The end result is that after an unusually long drought, I’ve recently undergone a period of renewed creativity, the first in a long time.  The kind where ideas keep me awake at night so I have to pen them down and get them worked out as quickly as possible.

Truthfully I’d been banging my head against the wall on a follow up to Fantasy Quest, basically a similar game with similar mechanics, in a horror setting with more of a focus on story and interactive decision making than combat, magic and levelling up.  The players are characters lost in a dark village where ‘very bad things’ are happening.  As they discover secrets about themselves their characters use emotions as resources to play actions which help them investigate their personal stories.  When their fears grow and their contentedness recedes their actions become more extreme and the game becomes more dangerous.  What combat there is happens quickly and is often deadly for the players.  Depending on the players’ ability to stay on top of the situation the board can actually be flipped over as the village literally goes to hell.  I was tiptoeing around the HPL mythos but wanting to develop more of a Hellraiser/Silent Hill type feel in an unspecified era of time.  As the number of choices each player has in each encounter grew the game’s complexity started to widen, and I didn’t want to lose that sense of exploring and mystery.  But I hit a certain mechanical blockage and will have to return to the game another time.  I still think there’s plenty of mileage in the ideas and will revisit it someday, but basically it was becoming too elaborate for me to focus on at this time so it has been shelved for the time being.

Luckily, I’ve had many other ideas percolating over the years…

As a child I always loved the history behind the Norman conquest of England in 1066, and particularly the Battle of Hastings as a key event in that conquest, and I ended up studying medieval history at college.  That such an instrumental event in English history was decided over the course of one battle in one day, and the heroism of and myths about both sides in the conflict always captured my imagination.  When Edward the Confessor died in January of 1066 he was succeeded by King Harold II, but numerous other claimants decided the English throne was theirs instead.  King Harold was quickly betrayed by his scheming brother Earl Tostig, who convinced Harald Hardrada, leader of the Vikings to try to take the throne.  Hardrada soon invaded from Norway, landing in the north-east of England and successfully defeating the English forces in the north.

In response King Harold set a still-unbroken world record by marching his soldiers 200 miles north in just 4 days to meet the Vikings at Stamford Bridge.  The trek was so unprecedented that Harold took the Vikings by surprise and defeated them so decisively that he ended the Viking threat to Britain for good.  But meanwhile Duke William of Normandy had been making his own plans to invade from the south and had already set sail for the shores of our fair country.  Once Harold received news of William’s invasion he had to march his soldiers the 200 miles back down south to meet and battle the Normans too.

And this is where my latest game ‘1066, Tears to Many Mothers’ comes in!

For a long time the game’s incarnation had been as a miniatures/cubes battle game on a map, and progress on it had been pretty slow.  So much of the game had been card-based that as soon as I made the decision to abandon the board fully and make it solely a card game, everything clicked and the game finally came together.  Fundamentally inspired by game mechanics from the likes of Magic the Gathering and The Lord of the Rings LCG but without the collectible nature, 1066 is a two player, non-collectible, asymmetric, competitive card game in the style of Magic, The Call of Cthulhu LCG, Mark Chaplin’s Aliens and even the Uncharted Board Game, which puts players in charge of the Normans or the Saxons and recreates the historic Battle of Hastings.

With a focus on quick, tactical play and a thematic abstraction of the events of the time, there is no deck building required, each player simply grabs his deck and shuffles and play begins.  And whilst there is a focus on some of the legends and mythology of the time you are to be warned, this game may also contain historical information.  :P

After putting the final touches together, I sat down with Sam to road test it, and I was really delighted with the results.  The first few play-tests of Fantasy Quest had been abortive at best and the development process continued for a long time after.  It had been a little soul-destroying (if ultimately very constructive) to have my close friends and family rip Fantasy Quest apart inch by inch forcing me to rebuild it into a much sturdier shape.  But the mechanics of 1066 are so much simpler and directly interactive that we were able to make a couple of minor adjustments on the fly here and there, with a lot of lessons learnt from my other games.  So when we reached the knuckle biting finish of our first game I was buzzing, even if Sam did strike the final blow and win the game.  And then quickly follow it up with another victory by slaying my King Harold with some truly devious card play culminating with an Arrow to the Eye…


Although greatly abstracted, like the real battle the game is fought over three Wedges with players comparing the Might of their cards in each Wedge.  The winner each round inflicts damage on that Wedge equal to the difference, and each Wedge has 10 Health.  The first player to defeat two Wedges wins the game.  Sounds simple, but of course, the game is all in the card play and the varying card abilities.  Each Wedge has three Rows, so players can play up to 9 Units or Characters at a time, with up to 3 Tactics cards in a 4th ‘Reserves’ Row.

But before players can duke it out at Hastings each side has a series of Objectives they must first overcome, such as crossing the channel to invade England, or marching back down south from Stamford Bridge to meet the invading Normans.  These act as miniature battles in themselves with players inflicting damage on the Objectives to defeat them, whilst also bringing their forces into play for the final showdown where one player will determine the fate of Britain!


Here are some teasers of the cards:


The Wax seal shows their cost to play in Resources.  You can discard cards for Resources on a 1 to 1 basis, and other cards in play can grant you extra resources.
The cross shows the Character's (or Unit's) Zeal.  Whoever has the most Zeal in a Wedge each round scores 1 extra bonus damage on that Wedge.  The axes represent Might, and the heart represents Health.

This is an ‘Alt Wars’ card game and if there is enough interest I will eventually follow it up with other famous battles, such as Agincourt.

There will be more info forthcoming about the game on this very blog here, so keep your eyes peeled.

FYI, the title quote comes from Eilmer of Malmesbury, writing in the Anglo-Saxon Chronicle in 1066.  He had seen Halley’s Comet in its perihelian passage and by all accounts it blazed in the sky for days, causing much concern to the medieval inhabitants of Britain.  So much so that Eilmer claimed it foretold the end of his country as he knew it, and he was right:

"You've come, have you? You've come, you source of tears to many mothers, you evil. I hate you! It is long since I saw you; but as I see you now you are much more terrible, for I see you brandishing the downfall of my country. I hate you!"
- Eilmer of Malmesbury, Anglo-Saxon Chronicle, 1066.


And finally, for those of you who have scrolled all the way down here, my next game is a coop and has you take a ‘present day to near future’ squad of elite soldiers up against a series of enemy bases and targets over the course of a military campaign.  You’ll be levelling up your squad, purchasing new gear, upgrades and skills, infiltrating lairs, hacking security, and taking out terrorists, rebels and their henchmen through the scope of a sniper rifle, down the barrel of a machine gun or with the blade of your knife as you choose your own specialist approach to tackling each objective.  Sort of Phantom Leader with commandos instead of aeroplanes…

Monday, June 25, 2012

Branching Paths at LCGPARIS 2012


Big shout out to Michael Hatik and all the French LOTR: LCG gamers at LCGPARIS 2012 who, whilst also play-testing FFG's new scenario Foundations of Stone, also played through my own Branching Paths scenario.  More info including photos of the event can be found here:

http://sdajce.forumactif.org/t837p120-championnat-des-lcg-samedi-23-juin-2012-photos


Looks like a great time was had by all!  :)

Tuesday, May 08, 2012

Brand, Son Of Ugly


We've been having problems looking at the ugliest character ever depicted in a card game:


So I came up with a solution:


Tuesday, May 01, 2012

Lost in The Long Dark


From the FFG article here:


The passage twisted round a few turns, and then began to descend… In the pale ray of the wizard’s staff, Frodo caught glimpses of stairs and arches, and of other passages and tunnels, sloping up, or running steeply down, or opening blankly dark on either side. It was bewildering beyond hope of remembering.
    –The Fellowship of the Ring, “A Journey in the Dark”
After surviving a desperate struggle with The Watcher in the Water, the heroes of Middle-earth pass at last through the Doors of Durin and into the ancient mines of Moria. Within those tunnels, your heroes must conduct their search for the source of the increased Orc activity within the Misty Mountains. But as they journey into The Long Dark of those ominous mines, your heroes press ever deeper into a network of tunnels that carves through rock for leagues and leagues.
In the fourth Adventure Pack of the Dwarrowdelf cycle, the ominous dark hangs heavier and closer around your heroes, and the going is slow. The Long Dark is choked with hazards and foes, and heroes must be careful to keep their way. Should they falter, they may find themselves stumbling into disaster…
Finding Your Way
The Long Dark introduces a new, scenario-specific mechanic known as a Locate Test. As your heroes navigate the massive subterranean realm of Moria, the Locate Test challenges their senses of direction. Will they head true? Or will they wander blindly through ancient and abandoned passageways, losing their way for days as their food supplies dwindle or stumbling at last into a goblin encampment?
When a Locate Test is triggered, the first player discards one card from his hand to discard the top card of the encounter deck. Some of the encounter cards in The Long Dark have a bold PASS printed in the lower-right corner. If the first player discards such a card from the encounter deck, then he succeeds at the Locate Test, the heroes regain their sense of direction, and they may continue deeper into the mines. If the encounter card does not have the boldPASS printed on it, the first player may continue to attempt the test, discarding cards from his hand to discard cards from the top of the encounter deck until he either has no more cards available to discard or chooses to stop attempting the test.
Fellowships that do not PASS their Locate Tests, however, may find their situations growing more and more dire. Many of the cards in the scenario have Lost effects on them that may trigger whenever your heroes lose their way. The more of these effects you accumulate in the staging area, the deadlier they become. At the heart of The Long Dark of Moria, fellowships that get lost may find themselves starved, exhausted, and surrounded by hostile Goblins.
The Long Dark is making its way to a retailer near you. Next week, as we continue moving in the right direction, we’ll take a look at a couple of the reasons the Dwarves do not fear the dark!

Thursday, April 19, 2012

Something Tookish Woke Up


“The hobbit felt the love of beautiful things made by hands and by cunning and by magic moving through him, a fierce and jealous love, the desire of the hearts of dwarves. Then something Tookish woke up inside him, and he wished to go and see the great mountains… and explore the caves, and wear a sword instead of a walking-stick.”
    –The Hobbit

We recently had the privilege to announce the upcoming release of The Hobbit: Over Hill and Under Hill for The Lord of the Rings: The Card Game. The response has been fantastic, and today we'll take a look at how this first Saga Expansion fits into the rest of the game.
As a Saga Expansion, The Hobbit: Over Hill and Under Hill introduces three scenarios drawn directly from the classic story by J.R.R. Tolkien, as well as a host of new heroes and player cards. Players can use any of their other The Lord of the Rings cards while playing through the scenarios fromThe Hobbit, and most of the expansion's cards can be used in any other deck, for any scenario, but The Hobbit also introduces five unique cards specifically designed for the expansion’s scenarios. These include Bilbo Baggins (The Hobbit: Over Hill and Under Hill, 1), an event with the Baggins sphere of influence, and the new treasure cards. These cards are only intended for use in The Hobbit: Over Hill and Under Hill and a second Saga Expansion, slated to arrive in late 2012, that will relate the second and final half of Bilbo’s adventures.
For more information about how these expansion-specific cards make The Hobbit: Over Hill and Under Hill a unique and engaging experience within Middle-earth, we turn to the expansion’s lead developer, Caleb Grace.
Caleb Grace on Bilbo, the Baggins sphere, and elven blades:
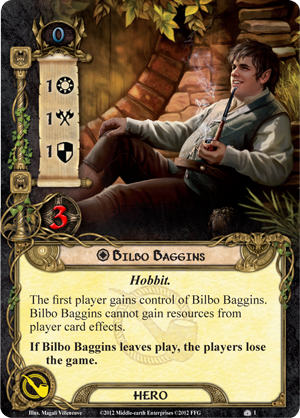
While we were working on The Hobbit: Over Hill and Under Hill Saga Expansion, one of the design team's top goals was to bring J.R.R. Tolkien’s story to life with the same unique mix of charm and peril found in The Hobbit. In his classic novel, Tolkien draws his reader into his fantastic world by exploring it through the eyes of Bilbo Baggins. We felt that the play experience of our Saga Expansion should follow suit. While Bilbo Baggins (The Hunt for Gollum, 1) already entered The Lord of the Rings: The Card Game as a playable hero, we wanted Bilbo to be more central to the events of The Hobbit. It wasn’t enough for Bilbo to pass around his card draw; we wanted each player to be able to take turns controlling the story’s central character, so we decided to create a new Bilbo Baggins hero that would be playable only in The Hobbit.
Adding another hero to the starting mix created some resource complications. How do you balance the game for a player who generates a base of four resources? And if Bilbo is just another hero, granting another resource, how is he special? Ultimately, we decided the best way to make Bilbo special was to add a new sphere of influence to the game: the Baggins sphere. By giving the Hobbit his own sphere of influence and giving players opportunities to gain benefits from using his resources within each scenario, we hoped players would feel like they’re reliving Bilbo’s adventures right alongside him.
Just like in the book, the unlikely burglar can either help or hinder his companions. As a free fourth hero, he boosts his controller’s strength, but because the players will lose the game if he leaves play, Bilbo can force players to play more cautiously. Meanwhile, his Baggins sphere resources allowed us to recapture some of the ways Bilbo influenced the company’s adventures, and they really make him stand out. His resources can be used to help the heroes on their journey at different times throughout the scenarios in The Hobbit: Over Hill and Under Hill. Because these resources are so pivotal, we didn’t want players to use cards like Steward of Gondor (Core Set, 26) to gain more, or some of the most unique elements of the quests could be rendered insignificant. Thus, we added the line, “Bilbo Baggins cannot gain resources from player card effects.” This makes sure that deciding when and where to spend his Baggins sphere resources will remain an interesting part of the game.
Meanwhile, the design team had long been eager to explore the idea of treasures in The Lord of the Rings: The Card Game, and The Hobbit seemed like the perfect place to introduce this new card type. Part of the appeal of the game’s scenarios is that they string together to tell a larger story. Each individual scenario your heroes undertake is but a part of the overall narrative. Still, it can be difficult to build continuity between the different chapters of that story when you can change cards, even heroes, along the way. We wanted to present players with incentive to change their approach to deck-building and game-play, and treasure cards gave us an answer; in order to include these powerful artifacts in their deck, players must first discover them in a specific scenario. After that, so long as players use the same heroes who found them, they can use those treasures in subsequent, related scenarios. These treasure cards represent some of the most famous artifacts in Middle-earth, like the elven swords that Bilbo, Gandalf, and Thorin found in the troll’s cave. Accordingly, they have strong abilities in that make them well worth the effort to discover and play in later scenarios.
Thanks, Caleb!
The whole design team has put a tremendous amount of time, energy, and love into The Hobbit: Over Hill and Under Hill to bring it as close to Bilbo’s adventures as possible.

Tuesday, March 27, 2012

Sneaking Past The Watcher in the Water, Part One


From the original FFG article here:

“The road must be trod, but it will be very hard. And neither strength nor wisdom will carry us far upon it. This quest may be attempted by the weak with as much hope as the strong. Yet such is oft the course of deeds that move the wheels of the world: small hands do them because they must, while the eyes of the great are elsewhere.”    –Elrond, The Fellowship of the Ring
Through The Redhorn Gate and along the Road to Rivendell, Arwen and the heroes of Middle-earth have been taxed nearly to their limits by snowstorms, perilous mountain passes, and wave after wave of ferocious ambushes. Now, at long last they have arrived safely at the Last Homely House. Though some of the heroes may hope their journeys through the Dwarrowdelf have come to an end, the truth is that they’ve only just begun.
Elrond, the master of Rivendell, is troubled by the great numbers of Orcs that once again infest the Misty Mountains. Many years have passed since the Orcs posed such a threat, and their return is troubling. Accordingly, Elrond asks the heroes of Middle-earth to explore the mines of Moria for the source of the increased Orc activity. But before the heroes can explore Moria’s vast network of tunnels, they must first gain entrance…
Beneath the gaze of the great
As we look forward to the release of The Watcher in the Water, the third Adventure Pack in the Dwarrowdelf cycle for The Lord of the Rings: The Card Game, we’ll take a close, practical, three-part look at the game’s new Secrecy mechanic, concluding with a deck list featuring the pack’s new hero.
While we’ve already learned how the mechanic works in an article on deck-building and received design insights in apreview of The Redhorn Gate, these haven’t been “practical” explorations of the mechanic. Why? The game hadn’t yet reached the critical mass of Secrecy cards and effects to make a Secrecy deck viable. The Secrecy cards introduced with the first two Dwarrowdelf Adventure Packs may present some excellent, cost-effective benefits for players who can keep their threat at 20 or below, but they don’t, on their own, offer enough reward to encourage decks built specifically to take advantage of Secrecy discounts.
That may change with The Watcher in the Water. This Adventure Pack introduces only one new card with the Secrecy keyword, but it bolsters the strategy with a number of exciting new cards that provide the card draw, resource acceleration, and threat manipulation that Secrecy decks need.
The aid of the Last Homely House
The master of Rivendell and his daughter lend their aid in The Watcher in the Water. Elrond lends your heroes his counsel before they set forth into the wild, and Arwen Undómiel (The Watcher in the Water, 58), having just traveled with the heroes across the Misty Mountains, offers to travel with them once more as an ally.
Though Elrond’s Counsel (The Watcher in the Water, 59) may soon form a core component of most Secrecy decks, it can easily fit into any deck with a Spirit hero. For the cost only of the card draw, Elrond’s Counsel both boosts a character’s Willpower by one and reduces your threat by three. Threat reduction is always good, and additional Willpower is always welcome, too.
Elrond’s Counsel put to the test
So what’s the catch? First of all, you need to control a unique Noldor character. While the new Arwen ally happens to be a Noldor from the Spirit sphere, she’s the only one. The only Noldor characters currently in the game include her brothers Elrohir (The Redhorn Gate, 1) and Elladan (Road to Rivendell, 28). They belong, respectively, to the Leadership and Tactics spheres. Then, there are only two more unique Noldor characters, Glorfindel (Core Set, 11) and Gildor Inglorion (The Hills of Emyn Muil, 79). This means the most reliable way to receive the benefits of Elrond’s Counsel is to start the game with a Noldor hero paired alongside a Spirit hero. Since the majority of the game’s Secrecy cards currently belong to the Leadership and Lore spheres, a two-hero Secrecy deck might be able to make good use of either Elrohir or Glorfindel.
Pairing Elrohir with a character like Ã‰owyn (Core Set, 7) means you start both with considerable Willpower to apply toward the quest, as well as the ability to ready a defender to attack. Elrohir’s Leadership icon allows you to make use of the fantastic event, Timely Aid (The Redhorn Gate, 3), and though it’s true Elrohir doesn’t have the greatest Defense Strength without Elladan in play, it’s still possible to bolster his defense with Dúnedain Warning (Conflict at the Carrock, 26) and Arwen’s ability.
Alternatively, you could pair Glorfindel with Frodo Baggins (Conflict at the Carrock, 25) or Dúnhere (Core Set, 9), either one of whom grants extra action potential, either by soaking wounds as threat and releasing you from the need of assigning a defender in certain situations, or by attacking enemies in the staging area, releasing you from the need to defend them. Meanwhile, the Lore sphere benefits from such Secrecy cards as Needful to Know (The Redhorn Gate, 9) and Out of the Wild (Road to Rivendell, 36).
If you build the right support into your deck, any of these starting fellowships provides you the means to push forward on your quest – all while remaining beneath the notice of most enemies. Your enemies might build up in the staging area, and you’ll need to confront them eventually, but if you adopt a good measure of Secrecy and heed Elrond’s Counsel, you should be able to recruit enough allies to your cause to deal with the enemies when the time is right.
Thus ends the first part of our look at how Secrecy hits critical mass in The Watcher in the Water. Check back over the next couple weeks for more previews and a Secrecy-focused deck list!

Tuesday, March 13, 2012

FFG News - Ambushed on the Road to Rivendell

Fantasy Flight Games [News] - Ambushed on the Road to Rivendell: "Road to Rivendell "

'via Blog this'


Suddenly Aragorn leapt to his feet. “How the wind howls!” he cried. “It is howling with wolf-voices. The Wargs have come west of the Mountains!”
    –The Fellowship of the Ring
Having barely pushed their way through the raging snowstorms along The Redhorn Gate, the heroes of Middle-earth continue their journey to Rivendell, heading down the westward slopes of the Misty Mountains. Though they leave the drifting snow and wintry weather behind them, the Road to Rivendell is not yet clear. Wargs, goblins, and other ferocious enemies lie in waiting to spring their ambushes upon the weary fellowship!
Ambushed on the Road to Rivendell
When we first announced the upcoming release of Road to Rivendell, we mentioned the Adventure Pack would be the first to introduce the new Ambush mechanic. This deadly new mechanic changes the way you encounter enemies, especially in multiplayer games. It forces the first player to tread lightly as your heroes journey westward and northward through the hills west of the Misty Mountains.
Each time an enemy with the Ambush keyword is revealed from the encounter deck, each player makes an immediate engagement check with it, starting with the first player, and players who fail to keep their threat low can quickly find themselves surrounded by enemies. In a four-player game, it’s possible to reveal four enemies and watch with terror as your heroes stumble into the middle of their ambush.
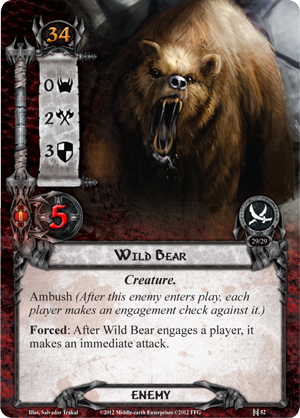
Of course, if an enemy leaps out of the staging area to engage you during the quest phase, it doesn’t oppose your progress with its threat. But before you start thinking that Ambush is a blessing in disguise, consider the true threat posed by an enemy like the Wild Bear (Road to Rivendell, 52). This ferocious predator bears your heroes no malice. The Dark Lord of Mordor does not guide its attacks. Instead, it’s driven by hunger alone, and it adds zero threat while in the staging area. However, if a player gets up to 34 threat, its Ambush keyword means this ravenous beast immediately engages a player, and its Forced response means that it attacks immediately. If a Wild Bear attacks due to Ambush, you cannot fool it with a Feint (Core Set, 34). You cannot remove the threat with a Quick Strike (Core Set, 35). You must simply defend against it or face the consequences.
Wicked tricks and snares
There are plenty of wicked little tricks and snares waiting for your heroes in Road to Rivendell. A Wild Bear attack during the quest phase may lead into the shadow effect of a Sleeping Sentry (Road to Rivendell, 46), triggering the discard of all exhausted characters, including the one who just exhausted to defend the Wild Bear. Or in a multiplayer game, one player may draw the Wild Bear right before the Sleeping Sentry wounds each exhausted character and exhausts each readied character.
Additionally, the first player to draw an Ambush may struggle to defeat multiple foes, and with multiple combatants pressing their attacks each round, the likelihood becomes greater and greater that you may face one of the scenario’s devastating shadow effects. Without a lot of Ranged and Sentinel characters, a multiplayer table will quickly learn that the threat of Ambush quickly outweighs the benefits you gain by drawing enemies out of the staging area during the quest phase.
Scouting ahead
The best way to avoid an ambush may be to send scouts ahead of the main party, and Road to Rivendell introduces an exciting Lore card that can help you navigate around some of the encounter deck’s nastiest surprises. Out of the Wild (Road to Rivendell, 36) can remove some of the encounter deck’s worst threats before you ever face them. At three cost, it’s a little expensive, but nothing unreasonable for a deck that runs a good measure of resource acceleration. Moreover, Out of the Wild features Secrecy 2, meaning if you can keep your threat at or below twenty, you can pick apart the encounter deck for a mere one resource.
Obviously, if you aren’t running A Test of Will (Core Set, 50) or Hasty Stroke (Core Set, 48), the Sleeping Sentry is a good candidate to remove from the deck, but Out of the Wild can do more than help you avoid the most troublesome encounter effects. In scenarios like The Hills of Emyn Muil or The Redhorn Gate, where you need to draw into the encounter deck’s victory points, Out of the Wild can filter out the cards that will just cost you extra turns. Remove encounter cards without victory points, and the chances increase that you’ll draw into cards that have victory points.
The Road to Rivendell is long and full of peril. You’ll need to remain wary to avoid Ambush, but there’s little time left for you to delay. The time is coming to resume your escort mission as you seek to bring Arwen safely home to Rivendell.

Monday, March 05, 2012

Shadow and Flame - the climactic final Adventure Pack of the Dwarrowdelf saga!


With a rush it leaped across the fissure. The flames roared up to greet it, and wreathed about it; and a black smoke swirled in the air. Its streaming mane kindled, and blazed behind it. In its right hand was a blade like a stabbing tongue of fire; in its left it held a whip of many thongs.
    “Ai! ai!” wailed Legolas. “A Balrog! A Balrog is come!”
    Gimli stared with wide eyes. “Durin’s Bane!” he cried, and letting his axe fall he covered his face.

   –J.R.R. Tolkien, The Fellowship of the Ring
In the Dwarrowdelf cycle of Adventure Packs for The Lord of the Rings: The Card Game, the heroes of Middle-earth have been tasked by Elrond to find the root of the increased Orc activity in the Misty Mountains. Through treacherous mountain passes, goblin ambushes, dark tunnels, and underground waterways, their journey leads them at last to the depths of Moria… and the terrible discovery that awaits them!
Fantasy Flight Games is delighted to announce the upcoming release of Shadow and Flame, the climactic final Adventure Pack in the epic Dwarrowdelf saga!
Durin’s Bane
In Shadow and Flame, the heroes of Middle-earth learn to their horror what power has gathered the Orcs of Moria and the Misty Mountains–the ancient power known as “Durin’s Bane,” a Balrog, a demon from the days of Morgoth!
Shadow and Flame marks the thrilling conclusion of the Dwarrowdelf saga, but how the narrative unfolds is up to you. Is it a heroic tale of overcoming unthinkable odds? Or is it a tragedy? This Adventure Pack unleashes the Balrog’s unrelenting fury upon the heroes of Middle-earth in truly ferocious combat!
Gone are the days of the First and Second Ages when legendary heroes fought Balrogs in single combat. Still, the heroes undertaking Elrond’s quest number among some of Middle-earth’s most powerful individuals. With no recourse but to fight or die, can they survive the demon’s onslaught?
Forge your destiny with sharpened steel
In Shadow and Flame, your heroes must face fiery swords, flaming whips, goblins, darkened caverns, and the fearsome Balrog in the greatest fight of their lives. Will they concern themselves with the success of their original mission while their very survival is at stake?
The player cards of Shadow and Flame provide your desperate heroes with exciting new means of clinging to life. They can try to maintain their Secrecy and add to their power with new events, allies, and attachments, including one of the three Elven Rings of Power! In this desperate hour, will it finally be time for the Ring’s owner to draw openly upon its power? Can you risk drawing the Eye of Sauron?
Rise to the challenge. Survive the greatest fight of your life. Confront the demon of Shadow and Flame.
The Dwarrowdelf cycle reaches its thrilling climax late in the second quarter of 2012!

Tuesday, February 21, 2012

Heroes in The Redhorn Gate, Part Three


From the FFG article here:


“If Gandalf would go before us with a bright flame, he might melt a path for you,” said Legolas. The storm had troubled him little, and he alone of the Company remained still light of heart.
   “If Elves could fly over mountains, they might fetch the Sun to save us,” answered Gandalf. “But I must have something to work on. I cannot burn snow.”
   “Well,” said Boromir, “when heads are at a loss bodies must serve, as we say in my country. The strongest of us must seek a way.”
   –J.R.R. Tolkien, The Fellowship of the Ring
Two weeks ago, we explored how different combinations of heroes might each tackle the unique challenges of The Lord of the Rings: The Card Game. Decks take on different personalities and the game plays differently depending on your choice of heroes in your starting fellowship.
We believe this variety is a good thing. Players have different personalities, and they should be able to build and play decks that suit them. In solo games, a player’s deck establishes the tenor of the entire game. In multiplayer games, however, a player’s deck influences part of the game, but not the entirety of it. It’s impossible for a player to change the shape of the entire game with just one deck among two, three, or four, but players may certainly still play decks that suit their styles. In fact, multiplayer offers more room for specialized roles than solo play.
Today, we look at some of the current multiplayer archetypes and explore some of the cards that make help these decks quest successfully.
What’s your style?
As the player card and hero pools for The Lord of the Rings: The Card Game expand, players gain more options for deck customization, allowing for greater focus on a theme or role than the pre-constructed decks from the Core Setoffer. Many of these reconfigured decks benefit from the combination of heroes and player cards from two or more spheres of influence, combining complementary cards from each sphere to reinforce the deck’s overall purpose.
Below, we identify a few multi-sphere deck archetypes and look at how the heroes play into each of them:
TANK
Heroes: Gimli (Core Set, 4), Boromir (The Dead Marshes, 95), Frodo (Conflict at the Carrock, 25)
The tank’s role is to engage as many enemies as possible, and destroy them. Frodo may seem out of place, but he acts as the “armor” that allows the player to engage more than he can safely block. Absorbing enemies is just as important a part of the tank’s duties as is destroying them.
As long as you don’t hit fifty threat, you generally want a higher threat than your teammates so that you’ll draw enemies out of the staging area before they’re forced to engage your friends. Boromir and Frodo can both raise your threat. Just be careful that you don’t put yourself at risk too early. The Galadhrim’s Greeting (Core Set, 46) is an expensive event for the deck, but it can help you stay in the game longer to support your friends.
Also, allies with Sentinel can help you better defend your teammates. The Gondorian Spearman (Core Set, 29) and Winged Guardian (The Hunt for Gollum, 4) can both block attacks directed at your teammates, and a Feint (Core Set, 34) can come in handy, too. Meanwhile, as you focus on absorbing hits so that your teammates won’t, you can expect to suffer some casualties, making the Horn of Gondor (Core Set, 42) a perfect fit.
HEALER
Denethor (Core Set, 10), Eleanor (Core Set, 8), Glorfindel (Core Set, 11)
The healer’s role is to keep the party alive, both by healing damage and by mitigating the dangers of the encounter deck. While other players focus on questing, attacking, and defending, the healer plays a quieter and subtler role away from the front lines and all the game’s primary action.
Denethor’s ability to scout the top card of the encounter deck is more useful in games with fewer players because he grants you information about a greater percentage of the encounter cards you’re due to face. On the other hand, Eleanor’s ability provides greater impact in games with more players, where you’ll face more cards and it’s more likely a single treachery card may steer your heroes off their course. Critical to your use of the deck is knowing when to use these heroes’ abilities, rather than keep them ready to support your teammates by defending against enemies.
Still, you can supplement these abilities with cards like A Test of Will (Core Set, 50) and Hasty Stroke (Core Set, 48) to lessen the impact of surprises from treachery and shadow effects. And when your scouting fails, you can still help your teammates recover quickly from their bruises with Glorfindel and cards like Lore of Imladris (Core Set, 63), Daughter of the Nimrodel (Core Set, 58), and Beorn’s Hospitality (Core Set, 68).
Apart from Glorfindel, your heroes aren’t much good in a fight, but they are clever. Even though you want to direct your focus elsewhere, if you can prompt some Infighting (A Journey to Rhosgobel, 58) among your foes, you may be able to help your party finish off wounded enemies.
ADVENTURER
Aragorn (Core Set, 1), Éowyn (Core Set, 7), Imrahil (A Journey to Rhosgobel, 50)
The adventurer’s role is to focus as much on questing as possible, and a starting fellowship of Aragorn, Éowyn, and Imrahil can quest with the best of them. Players have long debated whether or not Éowyn is critical to success in the game. She’s not “critical,” but it’s hard to argue that her four Willpower isn’t helpful. In a four-player game, she can quest for as much as eight Willpower if each player sacrifices a card to fuel her ability.
Aragorn and Imrahil fit the deck because they both share two Willpower and the ability to ready themselves after questing. Aragorn readies if he pays a resource from his pool, making him an excellent candidate to serve as the Steward of Gondor (Core Set, 26), and Imrahil readies whenever a character leaves play, meaning that he can react swiftly if your Snowbourn Scout (Core Set, 16) or Westfold Horse-Breaker (Core Set, 6) is struck down by an enemy or rides off to ready another hero.
Plus, Aragorn is Middle-earth’s greatest ranger and the rightful heir to Elendil’s throne. Accordingly, he gets a little extra love and benefit from some cards like Celebrían’s Stone (Core Set, 27), which not only gives him two extra Willpower but also adds a Spirit icon. This means the fellowship can play two-cost allies like Westfold Horse-Breaker and Escort from Edoras (A Journey to Rhosgobel, 55) each turn, rather than needing to save for them. With their extra Willpower, the quester can race forward to put progress toward your quest each turn.

Thursday, February 16, 2012

Heroes in The Redhorn Gate, Part Two


From the FFG article here:


“I think no good of our course from beginning to end, as you know well, Gandalf,” answered Aragorn. “And perils known and unknown will grow as we go on. But we must go on; and it is no good our delaying the passage of the mountains. Further south there are no passes, till one comes to the Gap of Rohan. I do not trust that way since your news of Saruman. Who knows which side now the marshals of the Horse-lords serve?”
    “Who knows indeed!” said Gandalf. “But there is another way, and not by the pass of Caradhras: the dark and secret way.”


    –J.R.R. Tolkien, The Fellowship of the Ring
The heroes of Middle-earth undertake great and perilous quests in The Lord of the Rings: The Card Game, and their threats increase the more fully they come to the Dark Lord’s attention. As in Tolkien’s epic fantasy, the heroes find themselves in the role of the underdogs, a small band setting forth into dangerous wilds and treacherous mines, filled with Orcs, Trolls, and other monstrous enemies.
Among the first choices players must make are which heroes to include in their fellowships. Last week, Nate French explained some of the reasons the rules allow each player to select up to three heroes, and as a rule, it has historically been foolish to choose any fewer. However, this week we explore the development of Secrecy and the impact it may have upon your starting fellowship.
Smart and secret
When we announced The Redhorn Gate back in October, we hinted at the Secrecy mechanic the Dwarrowdelf cycle develops. In January’s article,Boromir’s Guide to Deck Building, Part Two, we defined Secrecy in its simplest terms and we discussed how it can give players a means to accelerate their resources. Players who can keep their threat at 20 or below gain greater card effects at discounted prices.
Still, Secrecy does something more than just accelerate resources. It opens up an entirely different path for deck construction. Because the safest way to ensure you can trigger the discounts of your Secrecy cards is to start with 20 or less threat, Secrecy encourages the design of fellowships with only two heroes (or even just one!).
Today, Lukas Litzsinger, the lead developer of the Dwarrowdelf cycle, discusses how the Secrecy mechanic took shape:
The evolution of Secrecy
While the Secrecy cards introduced in the Dwarrowdelf cycle can be used in any deck, they are easily most useful when you keep your threat at 20 or below. Players can use cards such as The Galadhrim’s Greeting (Core Set, 46) orGandalf (Core Set, 73) to lower their threat, but in order to take advantage of Secrecy from the very beginning of the game, you need a low starting threat, which may lead players to experiment with decks that play two heroes, or even just one.
However, Secrecy didn’t start in its current format. In fact, the mechanic went through a lot of revisions. Because the game already provides lots of incentives for players to lower their threat, anything that rewarded players for lowering their threat as much as possible had to be carefully implemented. Originally, we developed Secrecy cards that could only be played by players who ran just one hero. That was too restrictive, so we tried with two. Fine-tuning the cards became a major concern. If the Secrecy cards were too good, then players who started with three heroes would sacrifice their heroes just to play them, or they might be even more devious and play a bunch of Secrecy cards before reviving their hero with a Fortune or Fate (Core Set, 54). If the Secrecy cards weren’t extremely powerful, then no one would bother playing without a third hero just to use them. Ultimately, we deemed that restricting the mechanic based on the number of starting heroes (or even the number of characters in play) was too problematic.
Basing their play on a threat restriction felt more thematic. Threat already represents how visible your party is to enemies, so making Secrecy effects playable only by players with extremely low threat worked thematically. Since your heroes also set your starting threat level, running heroes with very low threat, or running fewer than three heroes makes it easier to play Secrecy cards without having to draw a lot of threat reduction. It also makes it easier to keep your threat low while the encounter deck tries to raise it.
The last change the Secrecy mechanic saw was the introduction of the variable cost reduction. At first, Secrecy functioned like an on/off switch, but players were too heavily penalized when their threat skyrocketed, making them completely unable to play a bunch of cards in their decks. So the Secrecy discount allows for a middle-ground, requiring a set threat level, but then giving various discounts to the cards. You can still play Secrecy cards without Secrecy, and building a deck with Secrecy cards that suffers an unforeseen spike in its threat level does not leave you with a bunch of unplayable cards in your hand. 
Secrecy will open up new strategies for players, and make them reconsider the default rule of three heroes to a deck.

Tuesday, February 07, 2012

Heroes in The Redhorn Gate, Part One - A spotlight on the heroes of The Lord of The Rings: The Card Game


From the original FFG article here:


Aragorn was the tallest of the Company, but Boromir, little less in height, was broader and heavier in build. He led the way, and Aragorn followed him. Slowly they moved off, and were soon toiling heavily. In places the snow was breast-high, and often Boromir seemed to be swimming or burrowing with his great arms rather than walking.
    Legolas watched them for a while with a smile upon his lips, and then he turned to the others. “The strongest must seek a way, say you? But I say: let a ploughman plough, but choose an otter for swimming, and for running over grass and leaf, or over snow – an Elf.”
   –The Fellowship of the Ring

With the completion of the Shadows of Mirkwood cycle and the release of Khazad-dûm, players now have far more heroes from which to choose as they build their fellowships, but how do you decide which to include? Are there any hard and fast rules about the best ways to combine heroes from different spheres? Have you ever wondered why The Lord of the Rings: The Card Game limits players to three heroes in the first place?

Let’s start by addressing the last of these questions first. While it’s true that players can choose to run fewer than three heroes, it’s generally not advised.

The rule of three

A two-hero fellowship (or even a solitary hero) may be able to make progress toward the quest for a period of time, while slipping beneath the notice of any enemies in the staging area, but eventually the mounting threats of locations and enemies are likely to catch up to a small party. The Lord of the Rings: The Card Game is intentionally balanced for three heroes.

The game’s designer, Nate French, explains:

Three is a really strong number for game design. It presents possibilities for different approaches to games that can appeal to different types of players. When you play a game, having to focus on three options can lead you to a balanced approach that works like a tripod leaning equally upon all three sides (a tri-sphere deck, with one hero from each of three different spheres), or you may take a split focus between a major sphere with support from a minor sphere (a deck with two Spirit heroes, and one Tactics hero, for instance). Still another option exists, and you can focus all your efforts on a single point of interest (a focused, monosphere deck).

Having only two options for heroes would be too limiting in possibilities; it creates situations that are all an either/or or a perfect mix. Four options, on the other hand, would start to enter the territory of allowing players to do “everything” right out of the gate, which would lessen the meaning and impact of selecting heroes in the first place.

Another nice aspect of having three heroes in The Lord of the Rings: The Card Game is that you have three major points of focus each turn: questing, defending, and attacking. With three heroes, your hero base can cover the three main points of the game. With four options, you would start getting to the point where you’re trying to spin too many plates at once. Card games are filled with constantly shifting rules as cards enter and leave play, and adding another multiplier can just prove overwhelming.
Split or focused spheres?

Nate offers both a nice definition of the challenges The Lord of the Rings: The Card Game offers fellowships and a similarly succinct definition of the various approaches players may take to building their fellowships. Each turn players need to divide their fellowship’s attentions between questing, defending, and attacking, and as they consider how best to meet those demands, players can choose to combine two or three spheres of influence, or rely upon the strengths of a single sphere.

Of course, your concerns for deck construction will be slightly different if you’re building for solitary play than if you’re building for multiplayer games. In multiplayer games, players can split the game’s three main tasks (questing, defending, and attacking) between the two decks, so that one player may be responsible for questing while the other may do the dirty work of defending and attacking. In solitary play, however, one fellowship must balance all three tasks.

Many players have long noted they’ve met with greater success when running at least two spheres, whether split between multiple players or combining heroes from different spheres in a solitary deck. This is because the spheres each excel at different aspects of the game (and different tasks). While there are no hard and fast rules about combining the spheres of influence, strong decks must have plans built into them to commit Willpower to the quest, defend and destroy enemies, draw cards, generate resources, and survive the nastiest Treachery cards the encounter deck can throw at them.

Typically, Spirit cards provide high Willpower and efficient means of canceling Treachery effects, Lore cards provide excellent card draw, Leadership provides resource acceleration, and Tactics provides you the means of surviving and quickly defeating even the nastiest enemies. If you draw upon the strongest and most appropriate cards for your deck’s theme from two or three of these spheres, you can gain the traditional benefits of both (or all three) spheres, and you may be able to focus your deck even more keenly than if you hewed to just one sphere.
Ploughmen to plough, otters to swim

While a deck’s “personality” may be most clearly expressed in a multiplayer game, even single-player decks can express dramatically different approaches to the game, starting with their selection of heroes.

QUESTER: Dúnhere (Core Set, 9), Éowyn (Core Set, 7), Theodred (Core Set, 2)
Starting threat: 24
A quester focuses on committing as much Willpower as possible to the quest, while facing as little resistance as possible. Éowyn and Théodred quest each turn, while Dúnhere skirmishes enemies in the staging area. Cards that reduce threat, such as The Galadhrim’s Greeting (Core Set, 46) and Gandalf (Core Set, 73), are key to the success of this deck as they allow Dúnhere to attack without ever first having to face an attack.

FIGHTER: Éowyn, Gimli (Core Set, 4), Legolas (Core Set, 5)
Starting threat: 29
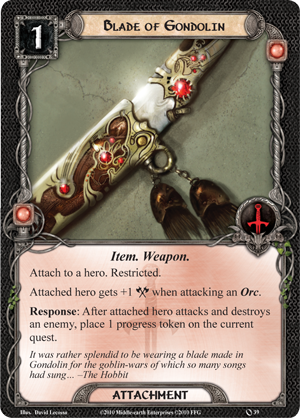
Unlike the quester, the fighter doesn’t shy away from getting down and dirty in combat. While Éowyn focuses on the quest, Gimli can take some hits and gets stronger for them. Legolas rewards you for fighting by adding progress tokens each time he helps defeat an enemy. An Unexpected Courage (Core Set, 57) on Gimli makes him a formidable combatant, and a couple copies of Blade of Gondolin (Core Set, 39) make felling foes even more rewarding.

SAGE: Beravor (Core Set, 12), Bifur (Khazad-dûm, 2), Bilbo (The Hunt for Gollum, 1)
Starting threat: 26
Knowledge is power, and knowledge in The Lord of the Rings: The Card Game is best represented by the cards and options in your hand. This focused trio of Lore heroes provides tremendous card draw, and you can add to it with Gléowine (Core Set, 62). The Lore sphere features a great number of cards to reduce the threat in the staging area and can convert card draw into Willpower via Protector of Lorien (Core Set, 70), but you’ll probably want to include some Songs to splash cards from other spheres.

PROTECTOR: Boromir (The Dead Marshes, 95), Eleanor (Core Set, 8), Frodo (Conflict at the Carrock, 25)
Starting threat: 25
This fellowship plays its low starting threat against the optional threat increases it can trigger from Boromir and Frodo to gain extra actions. As with the quester, the protector benefits tremendously from cards that reduce threat, allowing Boromir to quest, defend, and attack every turn. Cards you play to boost Boromir, such as Blade of Gondolin and The Favor of the Lady (Core Set, 55), provide tremendous rewards as he can use them all every turn.

JACK OF ALL TRADES: Aragorn (Core Set, 1), Beravor, Frodo
Starting threat: 29
Starting with three spheres, this fellowship can do a little bit of everything. Aragorn allows you to play Steward of Gondor (Core Set, 26) to accelerate your resources, while Beravor accelerates your card draw. You’ll have a lot of options in your hand every turn, and Aragorn and Frodo provide you with action advantage. Aragorn can pay resources to ready himself after committing to the quest, and Frodo can serve as a “defender” even while exhausted, absorbing damage as threat in times of need.
Looking ahead
Are you wondering how these archetypes may change with the release of The Redhorn Gate and the subsequent Adventure Packs from the Dwarrowdelf cycle? Next week, Part Two of this series takes a look at the impact Secrecy is likely to have upon your starting fellowships. Then, in two weeks, Part Three takes a closer look at multiplayer roles and the new hero from The Redhorn Gate!